WebhookScript Examples
Info
Do you have a nice example to share with other users? Or looking for even more examples? Take a look at the WebhookScript example repository, and make a pull request if you want to contribute: Webhook.site Script Repository
HMAC validation
The following script uses the hmac() function and the sha256 algorithm to verify a HMAC signature, which is commonly used to verify webhooks. In this example, the secret is secret and the signature comes from the incoming request's x-signature HTTP header.
If the signature doesn't match, further action execution is stopped and the URL immediately respond with a 401 status code.
hmac = hmac(var('request.content'), 'sha256', 'secret');
signature = var('request.header.x-signature', '');

if (hmac != signature) {
    respond('Unauthorized', 401);
}
JWT
An example acquiring an access token from the DocuSign API using JWT and the WebhookScript sign() function:
private_key = '-----BEGIN RSA PRIVATE KEY-----
MIIEowIBA...
-----END RSA PRIVATE KEY-----';

header = json_encode([
    'alg': 'RS256',
    'typ': 'JWT'
])

currentTimestamp = now().date_format('X').to_number()

body = json_encode([
    "iss": "00000000-0000-0000-0000-000000000000",
    "sub": "00000000-0000-0000-0000-000000000000",
    "aud": "account-d.docusign.com",
    "iat": currentTimestamp,
    "exp": currentTimestamp + 6000,
    "scope": "impersonation signature"
])

token = base64url_encode(header) + "." + base64url_encode(body)
signature = base64url_encode(sign(token, private_key, 'sha256'))
jwt = token + "." + signature

content = query([
    'grant_type': 'urn:ietf:params:oauth:grant-type:jwt-bearer',
    'assertion': jwt
])
headers = ['Content-Type: application/x-www-form-urlencoded']
response = request('https://account-d.docusign.com/oauth/token', content, 'POST', headers)

if (response['status'] != 200) {
    echo('Could not get token: ' + response['content'])
    stop()
}

response_json = json_decode(response['content'])
echo('Got access token: ' + response_json['access_token'])
Convert a date
In this example, if we assume the variable $mydate$ is set to 2021-07-26T16:23:50+03:00, the variable will be overwritten to 2021.07.26 16:23 for actions running after the WebhookScript action.
More information about available date format characters.
Request counter
This script uses Global Variables to keep track of the amount of requests sent to a Webhook.site URL within the last 10 minutes.
Once the 10 minutes are up, it sends a request to another endpoint with the amount of requests and the date, and then it resets the counter.
period = 600 // 10 minutes in seconds
currentPeriod = var('current_period', now())
counter = var('counter', 0).to_number()

currentPeriodSecs = date_interval(currentPeriod)

if (currentPeriodSecs < period) {
    counter = counter + 1
    store('counter', counter)
} else {
    // Above 10 minutes, reset and send request
    store('counter', 0)
    store('current_period', now())
    request(
        'https://webhook.site/14fea227-60ab-4291-b679-12b8c104c78e',
        json_encode([
            "counter": counter,
            "timestamp": now(),
        ]),
        'POST'
    )
}

echo('count : {}'.format(counter))
echo('period: {}'.format(currentPeriodSecs))
Parse and loop through JSON
This example shows various ways of iterating through JSON arrays, comparing data and rearranging it to another format.
First, it loops through the items array, verifying that the item must have a group ID that a specific one from an array.
Second, it changes the fields array from an array of objects to a key-value object using the name and value fields.
// Define input as a JSON string
json = '{
    "items": [
        {
            "first_name": "Jack",
            "last_name": "Daniels",
            "phone": "+1 100-555-999",
            "group_ids": [346, 46456, 23423],
            "fields": [
              {
                "id": 45698,
                "name": "birthday",
                "value": "1990-01-01"
              },
              {
                "id": 344,
                "name": "car",
                "value": "BMW M2"
              }
            ]
        },
        {
            "first_name": "Jim",
            "last_name": "Beam",
            "phone": "+1 123-555-788",
            "group_ids": [3456, 43546, 234234, 456456],
            "fields": [
              {
                "id": 45698,
                "name": "birthday",
                "value": "1987-05-01"
              },
              {
                "id": 344,
                "name": "car",
                "value": "Toyota Corolla"
              },
              {
                "id": 248,
                "name": "nickname",
                "value": "Jimmie"
              }
            ]
        }
    ]
}'

// Decode to array
data = json_decode(json)

// Define an array of valid groups
valid_groups = [43546, 999999]

// Loop over items
for (item in data['items']) {
    // Per default, item does not have a valid group.
    has_valid_group = false

    // Loop through each group ID in the data
    for (group_id in item['group_ids']) {
        // Does the "valid_groups" array contain this group ID?
        if (valid_groups.contains(group_id)) {
            has_valid_group = true
        }
    }

    if (has_valid_group) {
        echo(item['first_name'] + ' did not have a valid group.')
    } else {
        echo(item['first_name'] + ' has a valid group.')
    }

    // Extract "fields" into an array of key => value
    fields = []
    for (field in item['fields']) {
      fields[field['name']] = field['value']
    }

    echo(json_encode(fields))
}
Returns the following output:
Jack has a valid group.
{
    "birthday": "1990-01-01",
    "car": "BMW M2"
}
Jim did not have a valid group.
{
    "birthday": "1987-05-01",
    "car": "Toyota Corolla",
    "nickname": "Jimmie"
}
Loop through and compare items
In this example, we loop through a series of items and pick the item that's contained in a string.
location = 'test ABC example';

compares = [
  '123': 'token1',
  'ABC': 'token2',
  'DEF': 'token3',
]

token = ''; // Default value

for (compare in array_keys(compares)) {
    if (location.contains(compare)) {
        token = compares[compare]
    }
}

dump(token) // token2
Submit request with escaped JSON
If you're building a JSON object, we recommend doing it in WebhookScript instead of typing JSON in the Send Request action type (If you do anyway, we recommend using the .json Variable Modifier, More info here).
In this example, one of the JSON values contain HTML generated using the string_format function.
html_template = '<b><u>New {} lead</u></b><br>
<br>
Location: {}<br>
Message from customer:<br>
<div style="background:#CCC">{}</div>'

html_message = string_format(
    html_template,
    var('lead_type'),
    var('location'),
    var('message')
)

payload = json_encode([
    'lead': [
        'firstname': var('firstname'),
        'lastname': var('lastname'),
        'html': html_message
    ]
])


request(
  'https://example.com/leads',
   payload,
   'POST',
   ['Content-Type: application/json']
)
Validate request
In this example, we use a common method of verifying webhooks by taking a hash of its contents concatenated to a secret. It demonstrates the way WebhookScript can get various information about the request by using the get_variable() function, as well as string concatenation, hashing, if statements and returning responses with content, status codes and headers using respond(), which halts execution.
verification_secret = "JHRlc3RTY3JpcHRTZWNyZXQ"
verification_challenge = var("request.header.x-request-verification")
verification_result = hash(var("request.content") + verification_secret, "sha256")

if (!verification_challenge or verification_challenge != verification_result) {
    respond("Invalid request", 500)
}

respond("Successful request", 200)
Send a x-www-form-urlencoded request
content = query([
    'country': 'Curaçao',
    'population': 158665
])
headers = ['Content-Type: application/x-www-form-urlencoded'];
response = request('https://example.com', content, 'POST', headers);
Transform and resend
In the following, an incoming request is JSON decoded to an array, transformed and sent to "Web Service 1". Then the output is saved and passed on to "Web Service 2" in XML format. Basic error handling and validation is demonstrated.
// Configuration, fetched from the users' Global Variables in Control Panel
ws1_api_key = var('WS1_KEY')
ws2_user_token = var('WS1_USER_TOKEN')

// Function for error handling which stops processing further actions/code and returns an error message
function error (message) {
    echo('Error: {}'.format(message))
    respond(json_encode(['error': message]), 500)
}

// Parse original request
orig_req = json_decode(var('request.content'))

// If the JSON was invalid
if (!orig_req) {
  error('Invalid request')
}

// Send request to Web Service 1, using format() for string placeholders
// with JSON decoded values from the incoming request body
ws1_url = 'https://ws1.example.com/3.0/lists/{}/interest-categories/{}/interests'.format(
  orig_req['listId'],
  orig_req['groupId']
)

ws1_content = [
  'first_name': orig_req['firstName'],
  'last_name': orig_req['lastName']
]
ws1_response = request(
    ws1_url,
    json_encode(ws1_content),
    'POST',
    ['Authorization: Basic ' + ws1_api_key]
)

// Don't go further if the Web Service 1 step didn't succeed
if (ws1_response['status'] != 200) {
  echo(ws1_response['content']); // Log content to output
  error('Invalid response from WS1')
}

// Get a value from the Web Service 1 request
ws1_response_id = json_decode(ws1_response)['id']

// Pass response on to Web Service 2 in XML format, using a multi-line string and format()
ws2_content = '
  <qdbapi>
    <usertoken>{}</usertoken>
    <listid>{}</listid>
    <field fid="7">{}</field>
  </qdbapi>'.format(ws2_user_token, orig_req['listId'], ws1_group_id)

ws2_response = request(
  'https://ws2.example.com/db/zzzzzz',
  ws2_content,
  'POST',
  [
    "Action: API_EditRecord",
    "Content-Type: application/xml"
  ]
)

if (ws2_response['status'] != 200) {
  echo(ws2_response['content']); // Log content to debug log
  error('Invalid response from WS2')
}

// Output the WS2 response content to debug output
echo(ws2_response['content'])
respond('OK', 200)
Telegram bot
The Messaging service Telegram allows bots using their API. The general principle is this:
- Create a Bot using the /newbot command sent to the BotFather Telegram User
- Using the bot token sent from BotFather, use the Telegram API to create a Webhook subscription (using your Webhook.site URL)
- Add some logic using WebhookScript!
Note: Everywhere you see TELEGRAM_TOKEN, replace it with the token you got from BotFather!
Subscribe to Webhook
To create the Webhook subscription, change the token and the Webhook.site URL to your own and go to the following URL in your browser:
https://api.telegram.org/botTELEGRAM_TOKEN/setWebhook?url=https://webhook.site/a1351781
You should get a response similar to this:
First incoming Webhook
When you add your bot to your Telegram contacts list, Telegram automatically sends a /start command to the bot, which triggers a Webhook similar to this:
{
  "update_id": 176446573,
  "message": {
    "message_id": 1,
    "from": {
      "id": 2346545645,
      "is_bot": false,
      "first_name": "Simon",
      "language_code": "en"
    },
    "chat": {
      "id": 34534673234,
      "first_name": "Simon",
      "type": "private"
    },
    "date": 1581706369,
    "text": "/start",
    "entities": [
      {
        "offset": 0,
        "length": 6,
        "type": "bot_command"
      }
    ]
  }
}
You should be able to see this in the Webhook.site requests list.
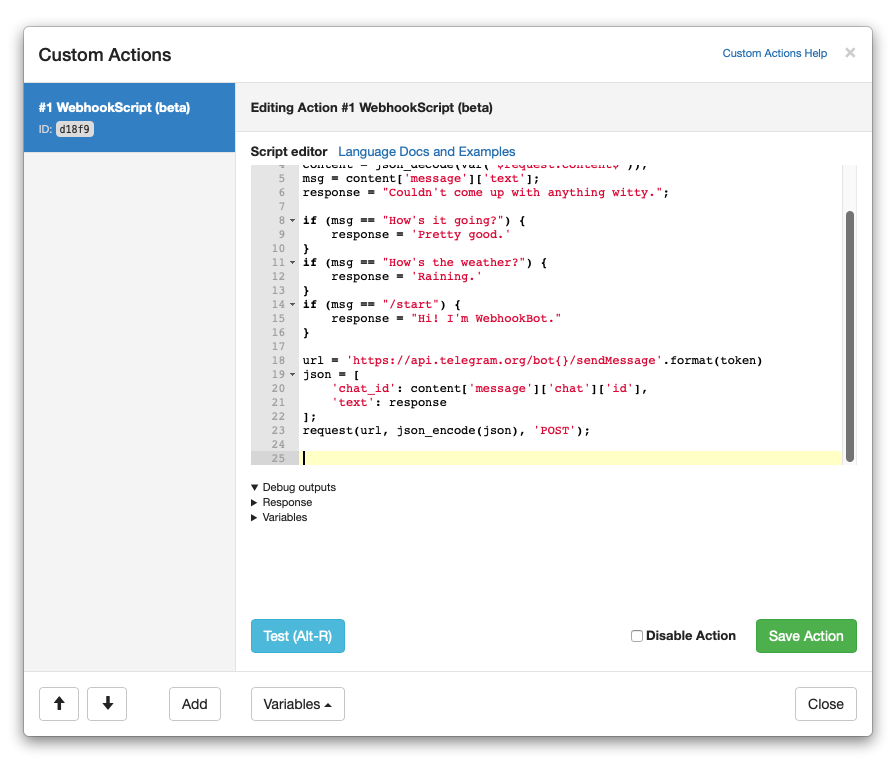
From this, we have all the parts needed to build a script that answers to commands:
// Telegram API token
token = 'TELEGRAM_TOKEN';

content = json_decode(var('$request.content$'));
msg = content['message']['text'];
response = "Couldn't come up with anything witty.";

if (msg == "How's it going?") {
    response = 'Pretty good.'
}

if (msg == r"You're (.*)") {
    match = regex_extract_first(r"You're (.*)", msg)
    response = 'No, YOU are {}'.format(match);
}

if (msg == "/start") {
    response = "Hi! I'm WebhookBot."
}

url = 'https://api.telegram.org/bot{}/sendMessage'.format(token)

json = [
    'chat_id': content['message']['chat']['id'],
    'text': response
]

request(url, json_encode(json), 'POST');
Things to note:
- The API token is added to the script, but could also have been saved in Global Variables in Control Panel and fetched out with the
var()function. - The third if-statement uses regex matching to provide a dynamic response. Someone typing "You're a bot" would receive "No, YOU are a bot"
- Finally, we JSON encode a WebhookScript array and send it using the
request()function.
Simply copy this script into a WebhookScript Custom Action (remember to change the token!), and click Save Action.
Then, you can interact with the bot using the Telegram app:
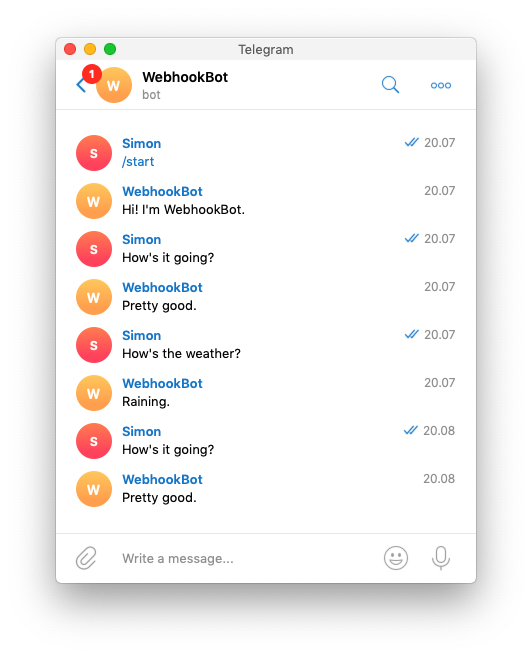
And that's it! Congratulations on your bot. It's not very smart, but from here, the possibilities are endless!
Building HTML content
The following script builds a piece of HTML content using the string_format function, based on previously defined variables, and shows how to use a function to return different content based on input.
After this, it sends a JSON request (by converting an array to JSON via the json_encode function) containing the HTML using basic Bearer authentication.
function alert_class() {
    if (status == 'Operational') { return 'success'; }
    if (status == 'Degraded Performance') { return 'warning'; }
    if (string_contains(status, 'Disruption')) { return 'danger'; }
}

template = '
  <div class="alert alert-{}">
    <h2 class="alert-title">{} - {}</h2>
    <p>
      {}<br />
      State: {}<br />
      Component affected: {}
    </p>
    <p>{}</p>
  </div>';

postbody = string_format(
  template,
  alert_class(),
  message,
  state,
  component,
  to_date('now').date_format('LLLL')
)

json = [
  'alert': [
    'title': '{} - {}'.format(component, state),
    'body': postbody,
    'draft': false,
    'types': ['alert']
  ],
]

request(
  'http://example.com/alerts',
  json_encode(json),
  'POST',
  [
    'Content-Type: application/json',
    'Authorization: Basic {}'.format(token)
  ]
)
Uploading and parsing CSV file
With this script, a file upload form is displayed when visiting the URL. After submitting the form, the CSV file is processed and validated (in this example, there must be more than 2 rows). If it can't be validated, an error message is shown. Finally, the user is shown an "Upload successful" message if the CSV file is valid.
url = var('request.url')
set_header('content-type', 'text/html');

// Display file upload form and exit if HTTP method is not POST
if (var('request.method') != 'POST') {
    respond('
        <html>
            <head><title>Upload CSV</title></head>
            <body>
                <h1>Upload CSV</h1>
                <form action="{}" method="POST" enctype="multipart/form-data">
                    <input type="file" name="file"/>
                    <button type="submit">Upload</button>
                </form>
            </body>
        </html>
    '.format(url))
}

// Use a comma as delimiter and treat first row (0) as header row
array = csv_to_array(var('request.file.file.content'), ',', 0)

// If CSV can't be parsed, or there's less than 2 rows, fail
if (!array or array.length() < 2) {
    respond('
        <h1>Could not parse CSV</h1>
        <a href="{}">Upload again</a>
    '.format(url));
}

// Display the parsed CSV in JSON format
respond('
    <h1>Upload successful</h1>
    <pre>{}</pre>
    <p>
        <a href="{}">Upload again</a>
    </p>
'.format(json_encode(array), url))
Converting all JSON data sent to a Webhook.site URL to a CSV file
This script has several moving parts:
- It remembers each time the export runs and only exports the requests that come after the last time the export was invoked
- It uses the Webhook.site API to fetch all requests sent to a Webhook.site URL
- It flattens the JSON data so that each field can become a header/column in the resulting CSV
- If the JSON data has a variable amount of fields ("columns"), this is handled automatically
- The resulting
$csv$variable can be used directly after, as an attachment, in e.g. a Send Email action
As an example, the following JSON data structure:
{
  "name": "Jack Daniels",
  "interests": ["programming", "reading"],
  "job": {
    "title": "Software Developer",
    "company": "Acme Corp"
  }
}
name,interests.0,interests.1,job.title,job.company
"Jack Daniels","programming","reading","Software Developer","Acme Corp"
set('api_key', '00000000-0000-0000-0000-000000000000');
set('token_id', '10000000-0000-0000-0000-000000000000');

// Should run the export from last date + 1 second (to avoid duplicates)
set('from', date_format(get('tracking-export-latest', '1990-01-01 00:00:00') + ' +1 second', 'YYYY-MM-DD HH:mm:ss'))
set('now', date_format('now', 'YYYY-MM-DD HH:mm:ss') )

json_data = []
is_last_page = false
current_page = 1
count = 0

while(!is_last_page and current_page < 100) {
    echo('Current page: %d'.format(current_page))

    api_url = string_format(
        'https://webhook.site/token/{}/requests?query=method:POST AND created_at:["{}" TO *]&sorting=oldest&per_page=50&page={}',
        get('token_id'),
        get('from'),
        current_page
    );

    res = http(
        api_url,
    [
        'method': 'GET',
        'headers': ['Api-Key: ' + get('api_key')]
    ])

    echo('HTTP Status: %s'.format(res['status']))

    data = res['content'].json_decode();

    if (is_null(data)) {
        echo('Could not parse json!');
        stop();
        break;
    }

    echo('Total: %s'.format(data['total']))

    is_last_page = data['is_last_page']
    current_page = current_page + 1

    for (item in data['data']) {
        // Collect latest date
        latest = item['created_at'];

        item_data = item['content'].json_decode();

        if (is_null(item_data)) {
            echo('Could not parse JSON!')
            stop()
            break;
        }

        json_data.push(item_data)
    }
}

// Handle empty strings, commas and escape quotes - used in next for loop
function csv_escape(input) {
    if (input.is_null()) { return ''; }
    return '"' + string_replace(input.to_string(), '"', '""') + '"';
}

// Calculate columns
// Not all JSON documents have all columns. Some have a variable amount,
// so we need to loop over the rows once to get the complete set
// of column header names.

csv_columns = []
csv_values = [];

for (row in json_data) {
    csv_row = [];

    // Flatten JSON structure using Extract JSON action
    extract = action('auto_json', ['source': json_encode(row)])

    // Collect all flattened names for use in header
    // + all rows with correct flattened names as keys
    for (var_name in extract.keys()) {
        if (var_name.contains('json.')) {
            var_name_pretty = var_name.replace('json.', '')
            csv_columns[var_name_pretty] = true;
            csv_row[var_name_pretty] = csv_escape(extract[var_name])
        }
    }

    csv_values.push(csv_row)
}

// Sort column headers and insert first header line
csv_columns = csv_columns.keys().sort();
csv = csv_columns.join(',')

// Insert rows, but use empty value if the column don't exist
for (csv_val in csv_values) {
    csv_row = [];
    for (csv_column_name in csv_columns) {
        if (csv_val.has(csv_column_name)) {
            csv_row[csv_column_name] = csv_val[csv_column_name];
        } else {
            csv_row[csv_column_name] = '';
        }

    }

    // Append row to CSV
    csv = csv + "\n" + csv_row.join(',')

    count = count + 1;
}

if (count == 0) {
    echo('Nothing processed. Stopping.')
    stop()
}

echo('Created CSV contents (%d rows)'.format(count))

// $csv$ and $count$ can be used in downstream actions, e.g. Send Email
set('csv', csv)
set('count', count)

// Store latest seen date for use next time
store('tracking-export-latest', latest)
Additionally, you can use the following script to clean up/delete the data that was converted to CSV - we'd recommend adding it as a separate Script action and gate it with a Condition (for example with a query string comparison, ?delete=yes) so no data is lost by accident.
// Delete CSV-processed data
api_url = string_format(
  'https://webhook.site/token/{}/requests?query=method:POST AND created_at:["{}" TO "{}"]',
  get('token_id'),
  get('from'),
  get('now')
)

res = http(
  api_url,
  [
    'method': 'DELETE',
    'headers': ['Api-Key: ' + get('api_key')]
  ]
)